This page compares several methods to use OpenStreetMap with QGIS. It gives detailed procedure to have a hiqh quality, customisable rendering along with routing capability.
A video on how to use osm2postgresql and QGIS together is available here:
http://www.youtube.com/watch?v=NBBYtH2svw0
- What is achieved with this tutorial
- Let QGIS access OSM data for rendering
- Let QGIS access OSM data for routing
- Apply patch
- Add new OSM icons
- Create level curves data
- Create QGIS project
- Author
What is achieved with this tutorial
Currently tested with full italy.osm
Rendering
[[File_Lago_di_varese.png|300px|thumb|right|Example achieved with this tutorial, same area as here. Click on image for higher resolution.]]
NEW: More high-resolution samples of rendering [[www.openstreetmap.org]] data with QGIS and [osm2postgresql] are available here: OpenStreetMap data rendered with QGIS.
TODO: Samples comparing rendering methods (for a few areas [dense urban, low density urban, country side, mountain] show results from qgis python plugin, osmarender, mapnik, and qgis rule-based rendering)
Routing
Using pgrouting.
If your osm file is small or if you have tens of GB of RAM (!), see this tutorial (read my comment on the same page). Otherwise please wait until I write here the solution I'm using...
TODO: Show screenshots, compare functionalities with the integrated routing capability and the few online OSM routing tools
Let QGIS access OSM data for rendering
Using osm2postgresql
New! (March 2011).
This is an easier and more powerful solution largely built on considerations and codes from this page.
See http://sourceforge.net/projects/osm2postgresql
and http://wiki.openstreetmap.org/wiki/Osm2postgresql
python plugin
This is the easiest but there are several problems:- Incorrect management of polygons and closed ways: the rule seems to be: something is a polygon if and only if it is a closed single line. OSM rules are much more complex than this (polygons can be made of several lines, may have holes, holes in holes... tags are involved as well). As a consequence, the python plugin fails to build many polygons (they become just a bunch of lines) and represent all roundabouts as polygons (those must be represented as [closed] ways, otherwise QGIS cannot render them with a border as osmarender and mapnik). See screenshot on the right side.
[[File_Qgis_osm_python_plugin_lago_varese.png|300px|thumb|right|Missing polygons (lake, some woods...) with python plugin. Compare with this ]] - Only a few tags are extracted into fields (in the attribute table). You should not save the 3 created layers as a shapefile as shapefiles will truncate the "tags" field (which contains a text representation of all fields). Right-click on a layer and "Save as" sqlite for instance to keep all tags in one text field.
- Probably limit in data size (would not work with planet.osm !).
- (The following seems to be fixed now: The 3 layers have weird pointers in the QGIS project: after saving the project, when reopening it, the points will not be recognized, so you need to "save as" all the 3 layers anyway before saving the QGIS project).
More details here:
Mapperz blog
OSM wiki.
With spatialite tools
[[File_Spatialite_osm_map_tool.png|300px|thumb|right|OSM data imported in spatiaLite using spatialite_osm_map ]]There are 3 spatialite tools available from http://www.gaia-gis.it
- spatialite_osm_map (import layers for mapping)
- spatialite_osm_net (create a clean network layer for routing)
- spatialite_osm_raw (import XML data "as is")
Only the first of those 3 tools was tested here.
Currently, some simple closed ways that should be imported as polygons are imported as linestrings, whereas the geometry is missing for complex polygons. In addition, for each feature only two tags (type and name) are extracted with the spatialite_osm_map tool.
Downloaded shapefile
It is easy to download shapefiles for a single country on cloudmade or geofabrik. They can be used directly in QGIS. An example of a web rendering made with such shapefiles is described here and can be tested here.
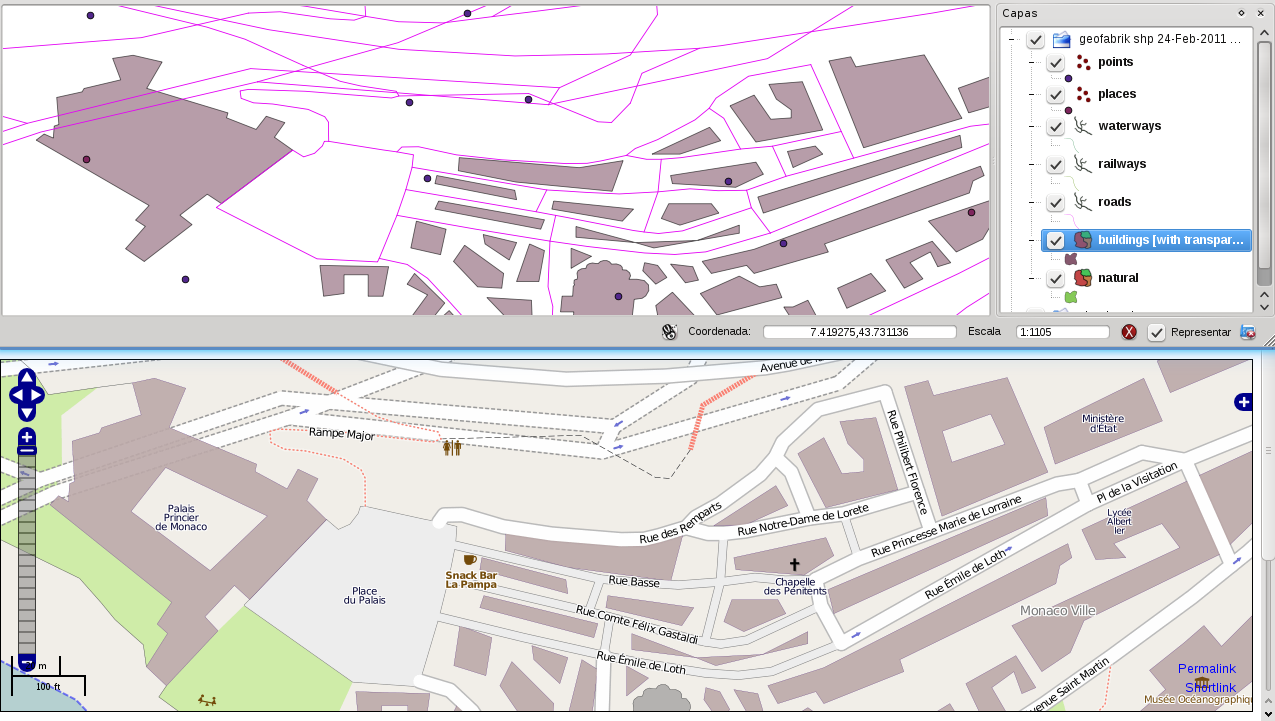
There are two main problems:- Polygons are inadequately processed. There are problems on even quite simple areas and polygons. A test was made on a small country (Monaco). In the cloudmade shapefile, all the polygons were gone except one (the monaco_natural.shp is missing while monaco_natural.dbf is there; their script probably crashed while generating polygons).
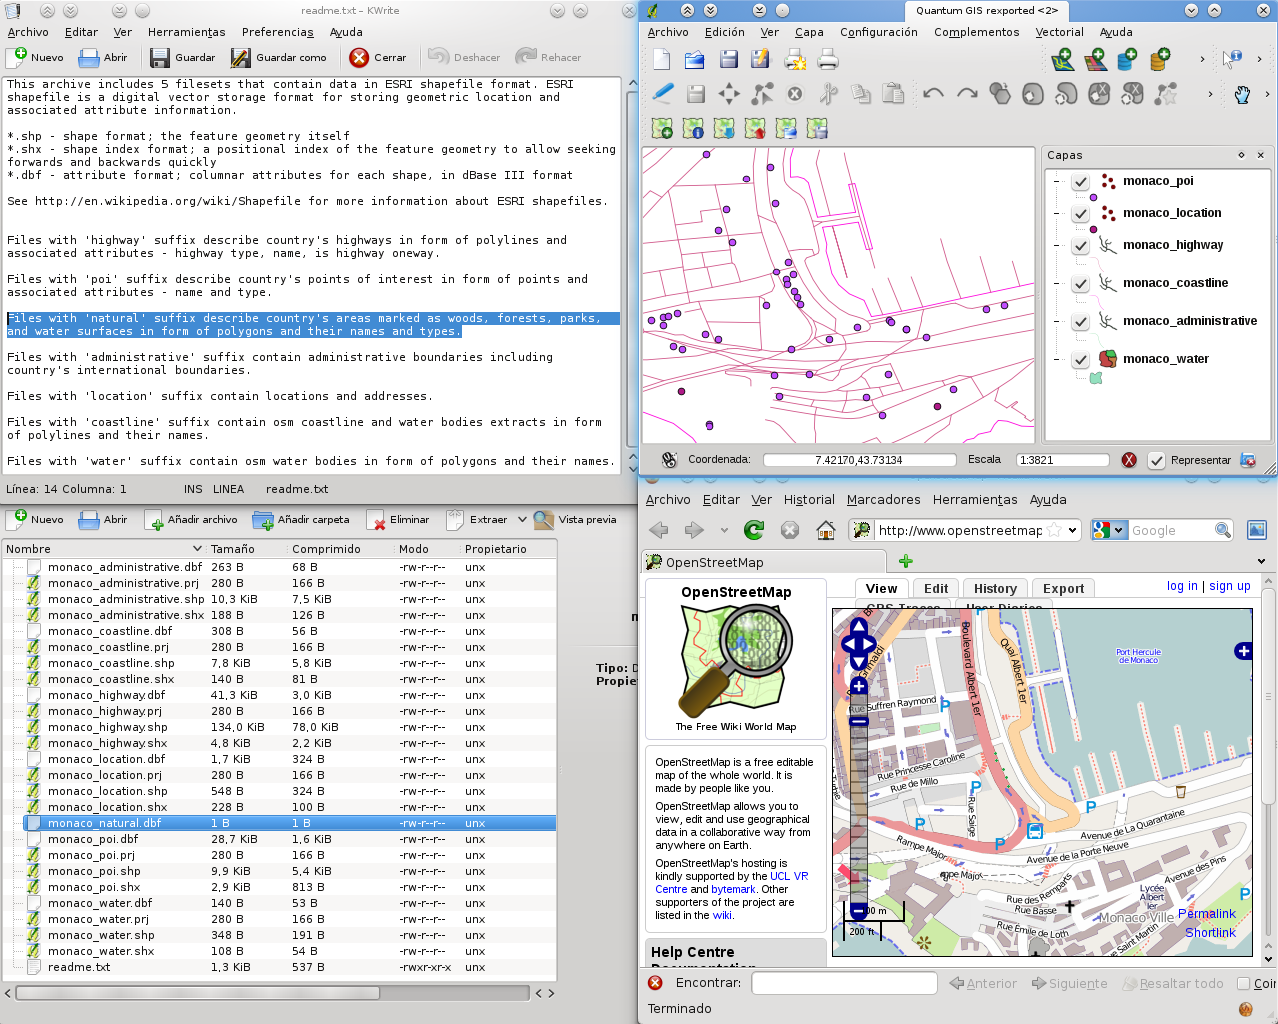 In the Geofabrik shapefiles, holes in polygons are ignored. (A deeper analysis may show more problems).
- Not all data are exported (including some features?) and not all tags are stored in the attribute table (this is partly due to technical limitations of the .dbf file format, dbf files storing the attributes related to the shapes). Since there are many keys in OSM data (most of them rarely used) it would not be efficient to create an attribute table with a column for each key (storing the values in the fields). Nor it is possible to concatenate all the keys->values pairs in a text string in a single column as .dbf files have a low size limit for each field.
Solving the polygon problem requires carefull geometrical analysis (made with sql script on this page).
It is possible to solve the tags problem with PostgreSQL with the hstore extension providing the hstore data format. (It is possible to concatenate a text representation of key/value pairs in long text field, in most recent database systems).
If you insist on using those shapefiles, do not forget to create a spatial index in QGIS (layer properties>General). Still, there is probably a limit in data size (would not be efficient with planet.osm converted as planet.shp!).
Through postgis
Best results, more tricky, dependency on postgis being installed.
(I will put detailed procedure here).
(I hereby release under the GNU/GPL livense v2 or above [at your choice] all the scripts in this postgis section, including the sql scripts to create polygons. MayeulKauffmann 17:28, 24 February 2011 (UTC)).
TODO: brief software and hardware requirements.
Download and uncompress data
Simplest is to use two commands (first wait because network is slow, then wait because CPU is slow...)
 wget download.geofabrik.de/osm/europe/italy.osm.bz2
 bunzip2 italy.osm.bz2
But is is faster to issue a multithreaded command instead: (see OSM wiki):
wget -O - http://download.geofabrik.de/osm/europe/alps.osm.bz2 | bzcat > alps-2010-02-06.osm
Configure postgresql server
Install postgres then postgis and hstore extension.
Tested on Ubuntu 10.04:
 sudo apt-get install pgadmin3 postgresql-8.4-postgis postgresql postgis  \
  postgresql-8.4-postgis postgresql-contrib-8.4 postgresql-server-dev-8.4  \
  build-essential libxml2-dev libgeos-dev libpq-dev libbz2-dev proj  \
  postgresql-8.4-hstore postgresql-8.4-hstore-new
Not all of the above is necessary (e.g. hstore already in contrib ubuntu package).
You can try the latest postgres 9.0 instead. Some useful features: much improved hstore support (compare 8.4 with 9.0), DROP COLUMN IF EXISTS facilitates testing and RE-testing,...
The interaction of the rights management between Linux and Postgre are a bit confusing. Also some operations can only be done as postgres (even if you give many privileges to your user), while doing everything as postgres will make it quite hard to give ownership of everything back to your user. I had to figure it out in several trials, the procedure below is not guaranteed to work on every configuration. It gives access for the user 'mk' (CHANGE THIS FOR YOUR NEEDS!). On linux shell:
 sudo su postgres
 dbname=osm # put here the name that you want for your database
 psql
 ALTER USER mk CREATEDB;
 \q
 createdb $dbname
 -- createdb --tablespace hometb $dbname -- if you want (see performance hints)
 createlang plpgsql $dbname
 #Install postgis:
 psql -f /usr/share/postgresql/8.4/contrib/postgis-1.5/postgis.sql -d $dbname
 psql -f /usr/share/postgresql/8.4/contrib/postgis-1.5/spatial_ref_sys.sql -d $dbname

 # as postgres, add hstore type to db:
 psql -d $dbname -f /usr/share/postgresql/8.4/contrib/hstore-new.sql
 echo "ALTER TABLE geometry_columns OWNER TO mk; ALTER TABLE spatial_ref_sys OWNER TO mk;ALTER SCHEMA public OWNER TO mk;" | psql -d $dbname

 echo "ALTER DATABASE $dbname OWNER TO mk;" | psql -d $dbname
 # echo "ALTER TABLESPACE hometb OWNER TO mk;" | psql -d $dbname

 # Optionally, as postgres, add admin pack (adds some functionalisties to pgadmin)
 psql -d $dbname  -f /usr/share/postgresql/8.4/contrib/adminpack.sql

 exit # comes back to 'mk' user
Create OSM structure in PostgreSQL database
 dbname=osm
 # Download osmosis, then create empty tables (OSM schema)
 psql -f ./osmosis/osmosis-0.38/script/pgsql_simple_schema_0.6.sql  -d $dbname
 psql -f ./osmosis/osmosis-0.38/script/pgsql_simple_schema_0.6_bbox.sql  -d $dbname
 psql -f ./osmosis/osmosis-0.38/script/pgsql_simple_schema_0.6_linestring.sql  -d $dbname
Import data into postgresql/postgis
You might need to define another temporary folder (on Linux, /temp is used so it's cleaned at each reboot...):
export JAVACMD_OPTIONS="-Djava.io.tmpdir=/hometb/mk/sig/tmp"
You should probably test with a smaller area first (see OSM wiki). You can extract one with:
./osmosis-0.37/bin/osmosis --read-xml /hometb/mk/sig/italy_osm/italy.osm enableDateParsing=no --bounding-box top=46.074 left=8.295 bottom=45.429 right=8.894 --write-xml file=/hometb/mk/sig/italy_osm/italy_north.osm
You could directly import a .osm file with this multithreaded osmosis command:
./osmosis-0.38/bin/osmosis -v --read-xml file="/hometb/mk/sig/italy_osm/italy.osm" --buffer --write-pgsql host="127.0.0.1" database="$dbname" user="$pguser" password="$password"
The --buffer option allows multithreading.
Still, do it in two steps unless you have very high performance machine (including very fast disks) or unless you import a small file.
Convert (xml) OSM data into sql commands (SQL import step 1/2)
./osmosis/osmosis-0.38/bin/osmosis --read-xml file="~/myarea.osm" --write-pgsql-dump directory=~/myarea
Read sql file to import data into postgresql/postgis (SQL import step 2/2)
Here using psql for better performance
On linux shell (your user, not postgres):
 cd ~/myarea
 psql -f osmosispath/osmosis/osmosis-0.38/script/pgsql_simple_load_0.6.sql -d $dbname
Create polygons where relevant
(Quite tricky: The data structure is still largely debated in OSM wiki! Still good enough results are obtained with script below, which is still under development).
  -- -- -- -- -- -- -- --
  --  POLYGONS - -- -- --
  -- -- -- -- -- -- -- --
  -- CREATE TABLE WITH POLYGONS MADE OF A SINGLE LINESTRING
  DROP TABLE simple_polys;
  CREATE TABLE simple_polys AS(
    select  idint4,
      ST_MakePolygon(linestring) as polygon,
      regexp_replace(tags::text, '=>', '=', 'g')  as tags,
      tagshstore,
      area(ST_MakePolygon(linestring)) as area -- TODO: convert into metric system (or better do it on projected, metric data, processing eveything after reprojection)
    from ways
    where IsClosed(linestring)
      and NPoints(linestring) > 3
  );
  CREATE UNIQUE INDEX idx_idint4_simple_polys ON simple_polys (idint4);

  -- ADD polygons to TABLE relations
  ALTER TABLE relations ADD COLUMN idint4 int4;
  UPDATE relations SET idint4 = id::int4;
  CREATE UNIQUE INDEX idx_idint4 ON relations (idint4);

  ALTER TABLE relations RENAME COLUMN tags TO tagshstore;
  ALTER TABLE relations ADD COLUMN tags text;
  UPDATE relations SET tags = regexp_replace(tagshstore::text, '=>', '=', 'g');

  ALTER TABLE relations DROP COLUMN outerring_array;
  ALTER TABLE relations DROP COLUMN outerring_linestring;
  ALTER TABLE relations DROP COLUMN outerring;
  ALTER TABLE relations ADD COLUMN outerring_linestring geometry;
  ALTER TABLE relations ADD COLUMN outerring_array int4[];
  ALTER TABLE relations ADD COLUMN outerring geometry;

  ALTER TABLE relations DROP COLUMN innerring_linestring;
  ALTER TABLE relations ADD COLUMN innerring_linestring geometry[];

  ALTER TABLE relations DROP COLUMN polygon;
  ALTER TABLE relations ADD COLUMN polygon geometry;

  -- create an ARRAY of all outerrings
  UPDATE relations SET outerring_array = (
    select  array_agg( r1.member_id) as array1
    from relation_members r1, ways
    where r1.member_role = 'outer'
      and r1.relation_id = relations.id
      and ways.idint4 = r1.member_id
      and NPoints(ways.linestring) > 1 and IsValid(ways.linestring)
    GROUP BY r1.relation_id
  );

  -- create outerring linestring (not checked if valid yet)
  UPDATE relations SET outerring_linestring = (
    select   ST_LineMerge(ST_Collect(ways.linestring))
    from relation_members r1, ways
    where r1.member_role = 'outer'
    and r1.relation_id = relations.id
    and
    NPoints(ways.linestring) > 1 and IsValid(ways.linestring)
    and ways.idint4 = r1.member_id
    GROUP BY r1.relation_id
  );

  -- create innerrings linestrings (not checked if valid yet)
  UPDATE relations SET innerring_linestring = (
      ARRAY(
            select ST_LineMerge(ST_Collect(linestring)) as inner_ring from ways where ways.idint4  IN
       (SELECT member_id from relation_members r1
              where r1.relation_id = relations.idint4 and r1.member_role = 'inner'
             )
           )
     )
    where array_length(ARRAY(
            select ST_LineMerge(ST_Collect(linestring)) as inner_ring from ways where ways.idint4  IN
              (SELECT member_id from relation_members r1
                   where r1.relation_id = relations.idint4 and r1.member_role = 'inner'
              )
           ),1) >0 --check that there is at least one inner line
  ;

  ALTER TABLE relations DROP COLUMN poly_type;
  ALTER TABLE relations ADD COLUMN poly_type text;

  UPDATE relations SET poly_type= 'unknown';

  -- a ring with only 3 points is flat: A-B-A (1st point = 3rd point), hence buggy
  UPDATE relations SET poly_type= 'no valid outerring' where
  NPoints(outerring_linestring) < 4 -- 5 relations are buggy in italy.osm
  or outerring_linestring IS NULL -- about 16000 (relations between simple nodes?)
  ;
  -- the above must be done before what follows, because if less than 3 points, test may crash
  UPDATE relations SET poly_type= 'no valid outerring' where
  poly_type = 'unknown'
  and NOT IsClosed( outerring_linestring); -- 136 are buggy in italy.osm

  UPDATE relations SET poly_type= 'no valid outerring' where
  poly_type = 'unknown'
  and NOT IsSimple( outerring_linestring); -- 102 more are buggy in italy.osm

  -- If (NOT poly_type= 'no valid outerring') after the above, it means there is a valid outerring. Now, let us see if there is a valid inerring (or several)

  -- if there is no inner line, there is no valid inerring
  UPDATE relations SET poly_type= 'no valid inerring'
  where poly_type = 'unknown'
  and innerring_linestring IS NULL
  ; -- 3015 more have no valid inerring

  -- innering must be closed
  UPDATE relations SET poly_type= 'no valid inerring'
  where poly_type = 'unknown'
  and (NOT ISClosed(ST_LineMerge(ST_Collect(innerring_linestring ))))
  ; -- 44 more are buggy

  -- innering must be big enough
  UPDATE relations SET poly_type= 'no valid inerring'
  where poly_type = 'unknown'
  and NPoints(ST_LineMerge(ST_Collect(innerring_linestring ))) <4
  ;

  -- Create simple polygon not having (valid) innering(s)
  UPDATE relations SET polygon = MakePolygon(outerring_linestring)
  where (poly_type = 'no valid inerring'
  OR poly_type = 'unknown')
  --   and id=1309665
  and GeometryType((outerring_linestring)) ='LINESTRING'
  ;

  -- select polygon /*makePolygon(outerring_linestring)*/ from relations where id=1309665
  -- and (poly_type) IS NULL
  -- ;

  -- check further validity of innerring: closed and big enough
  -- however, if there are several holes and only one is too small, the test based on NPoints()
  -- will not be sensitive enough (such wrong relations are probably extremely rare; none found in italy.osm).
  -- FIXME: is this still necessary after the tests above?
  UPDATE relations SET poly_type= 'valid innerring'
  where poly_type = 'unknown'
  and ( ISClosed(ST_LineMerge(ST_Collect(innerring_linestring ))))
  and NPoints(ST_LineMerge(ST_Collect(innerring_linestring ))) > 3
  ;

  -- select id,poly_type from relations where ISClosed(ST_LineMerge(ST_Collect(innerring_linestring ))) and NPoints(ST_LineMerge(ST_Collect(innerring_linestring )))=3; --should give no result if OSM data were perfect; not the case (2 results for italy.osm).

  UPDATE relations SET polygon =
  ST_MakePolygon(outerring_linestring, (innerring_linestring ))
  where poly_type= 'valid innerring'
  and GeometryType(outerring_linestring) ='LINESTRING';
  -- and ( ISValid(ST_LineMerge(ST_Collect(innerring_linestring ))))
  -- and idint4<>1251293 -- FIXME for this relation: "lwpoly_from_lwlines: holes must have at least 4 points". This polygon fixed by mayeul in changeset 7230859. This is no longer an issue thanks to above test: NPoints(ST_LineMerge(ST_Collect(innerring_linestring ))) > 3

  --Disaggregate multilines into linestrings, one per row
  DROP TABLE if exists dumped_multilinestring;
  CREATE TABLE dumped_multilinestring AS (
  SELECT relations.id as relation_id, tags, tagshstore,
    generate_series(1,(Select ST_NumGeometries(outerring_linestring))) as lineseq,
    ST_GeometryN(outerring_linestring, generate_series(1, ST_NumGeometries (outerring_linestring))) AS outerring_linestring
  FROM relations
    where GeometryType(outerring_linestring) ='MULTILINESTRING' --anyway the query would not give any 'LINESTRING'
  );

  -- CREATE UNIQUE INDEX idx_dumped_multilinestring_idint4 ON dumped_multilinestring (idint4);
  CREATE INDEX idx_dumped_multilinestring_relation_id ON dumped_multilinestring (relation_id);

  ALTER TABLE dumped_multilinestring ADD COLUMN outerring_polygon geometry;
  UPDATE dumped_multilinestring set outerring_polygon = MakePolygon(outerring_linestring)
    where isclosed(outerring_linestring);
  ALTER TABLE dumped_multilinestring ADD COLUMN idint4 int4;
  UPDATE dumped_multilinestring set idint4 = relation_id*1000 + lineseq; --*might* create duplicate id if more than 999 linestrings in a single multilinestring AND if bad luck
INSERT INTO geometry_columns (f_table_catalog, f_table_schema, f_table_name, f_geometry_column, coord_dimension, srid, "type") (SELECT _*::text, 'public'::text, 'dumped_multilinestring'::text, 'outerring_polygon'::text, 2::integer, 4326::integer, 'GEOMETRY'::text from dumped_multilinestring limit 1);
-- TODO: add other rows in geometry_columns
  -- Delete polygons from simple_polys that are also stored in dumped_multilinestring and have essentially similar or less informative tags
  DELETE FROM simple_polys WHERE simple_polys.idint4 IN (
  select  s.idint4
  from simple_polys s, relation_members, dumped_multilinestring m
  where  s.idint4 = relation_members.member_id AND
    m.relation_id = relation_members.relation_id
  and  (array_length(akeys(s.tagshstore),1)  < array_length(akeys(m.tagshstore),1) OR akeys(s.tagshstore)::text='{}')
  and relation_members.member_role ='outer' -- keep a simple polygon if it is just an inner in multilinestring
  and (
  -- array_length(akeys(s.tagshstore),1) =0  is not true when tagshstore is empty
  akeys(s.tagshstore)::text='{}'
  OR s.tagshstore -> 'natural' = m.tagshstore -> 'natural' -- sometimes the tags for the simple_polys are quite different; this tries to exclude those but testing that the values is the same for at least one of the 3 follwing keys
  OR s.tagshstore -> 'landuse' = m.tagshstore -> 'building'
  OR s.tagshstore -> 'landuse' = m.tagshstore -> 'building')
  group by s.idint4 )
  ;
  -- Put all polygons in a single table
  DROP TABLE IF EXISTS polygons ;
  CREATE TABLE polygons AS (
    SELECT idint4, tags, tagshstore, polygon, id as relation_id from relations
    UNION
    SELECT idint4, tags, tagshstore, polygon, NULL::int4  as relation_id from simple_polys
    UNION
    SELECT idint4, tags, tagshstore, outerring_polygon, relation_id from dumped_multilinestring
  );
  CREATE UNIQUE INDEX idx_polygons ON polygons (idint4); -- I think the above guarantees uniqueness but I am unsure (is it necessary to chech whether relation ids overlap with ways id?). No problem for italy.osm
  ALTER TABLE polygons ADD COLUMN name text;
  UPDATE polygons set name= tagshstore -> 'name' where exist(tagshstore,'name')
  ;
INSERT INTO geometry_columns (f_table_catalog, f_table_schema, f_table_name, f_geometry_column, coord_dimension, srid, "type") (SELECT _*::text, 'public'::text, 'polygons'::text, 'polygon'::text, 2::integer, 4326::integer, 'GEOMETRY'::text from polygons limit 1);
Optimization tips
Reproject the data before using them
Reproject while doing the data import, not on the fly (otherwise : performance killer) see
http://www.qgis.org/wiki/Rendering_Performance
(Osmosis nor osm2pgsql cannot reproject. Yet to be tested: http://postgis.refractions.net/documentation/manual-1.5/ST_Transform.html)
Currently, parameters in symbology can only be mm (relates to size on device, i.e. proportional to number of pixels) or map unit. Qml styles mentioned below were designed with a metric map unit and rely on it (for instance, a given type of road can be change displayed with a 10-meter width). Using realistic width for linear features gives nice results while zooming with small increments on scales between 1:100,000 and 1:500. It is impossible to achieve with pixel-based width. (You should modify the styles if you use lat-long unprojected data: a 10-meter wide way would be represented as a 10 degrees wide way!!).
Any world, metric projected system would do it. Suggestion is to reproject to Google mercator (compatible with openlayers plugin). (EPSG:....)
Disk access
If you have several hard disks, you can put some postgresql tables on one disk and other tables on another one (the disk space you use is called a 'TABLESPACE').
This is what I did (my home is /home; I have another disk mounted at /hometb):
 sudo chown -R postgres:postgres /hometb/mk/sig/OSM/postgresql/
 sudo su postgres
 psql gis
 -- DROP TABLESPACE  IF EXISTS hometb;  -- be careful with this!
 CREATE TABLESPACE hometb LOCATION '/hometb/mk/sig/OSM/postgresql/';
 -- SET default_tablespace = hometb; -- this is not necessary, you can define the TABLESPACE while creating a table
 \q
Let QGIS access OSM data for routing
Using pgrouting. Allows to define own routing parameters: pedestrian, hiking, road bicycle, mountain bike, car (fast), car (tourism), etc. (including slope of roads for non-motor vehicle).
Apply patch
This is not longer required if you use the latest 1.7.0 QGIS version. Otherwise:
- Download source code
- Apply latest patch mentioned at http://trac.osgeo.org/qgis/ticket/3222
- Build from source, see QGIS wiki.
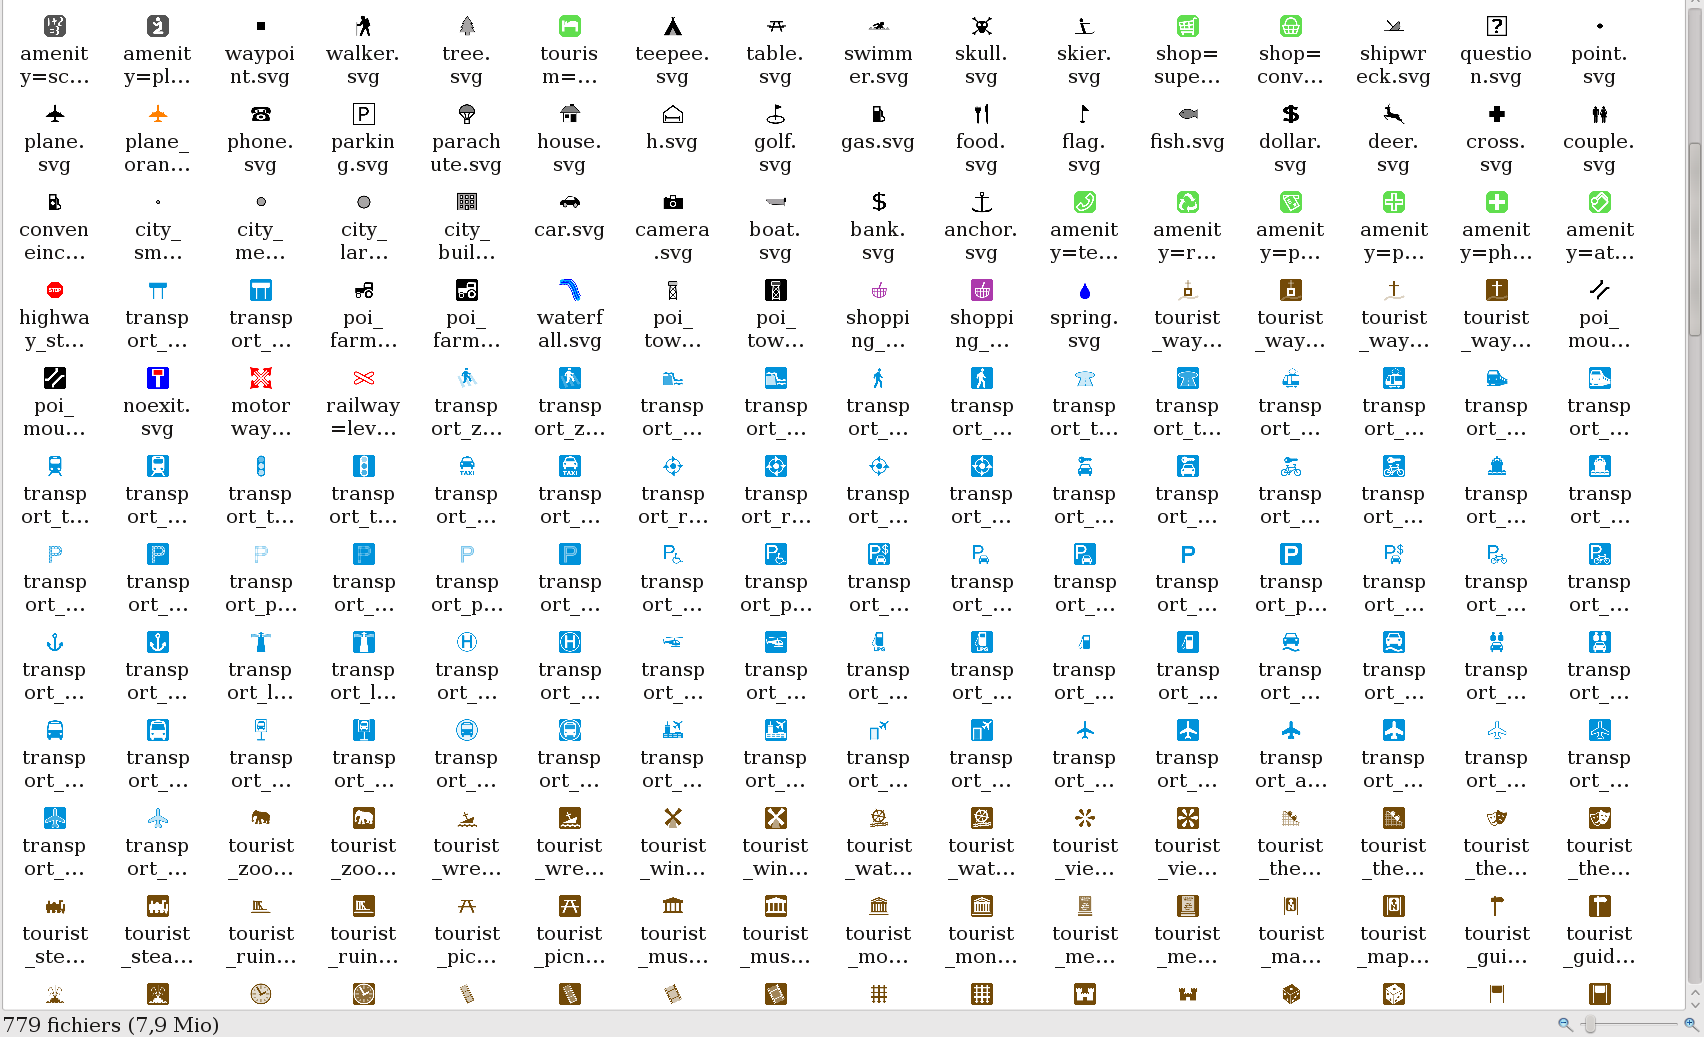
Add new OSM icons
![]()
Most of the icons used were derived from files modified from the original ones available here. Some were created from scratch by MayeulKauffmann, some were fixed to avoid rendering bugs, all were (re)generated with a custom script (adapted from the one available here).
Coloured (transformed) icons (along with original QGIS icons) are available here (osm_icons4qgis_v1.zip):
http://www.mediafire.com/?344x43313q3xx8n
This is a copy of the folder I use for rendering.
The osm_icons4qgis_v1.zip file contains original QGIS icons plus a set of coloured icons based on/inspired by SJJB icons:
- I created coloured icons instead of black icons (those are similar to http://www.sjjb.co.uk/mapicons/contactsheet except you will not find svg coloured icons nor the tools to create them on sjjb website)
- I created icons without background (negative of above icons) which take much less room on the map
- I fixed some icons that had a white drawing outside of the svg document border (this does not show up when you work with a white background screen in inkscape or when rasterizing the icons as SJJB does, but it showed up on qgis screen)
- I created several new original icons from scratch that I want to release under the same licence as SJJB (will be simpler for SJJB management to redistribute them if they want to)
- I fixed some typos in filenames
The icons I created or modified should be the following (base on file date on my file system):
accommodation_hostel.svg
amenity_survey_point.svg
food_ice_cream.svg
poi_embassy.svg
poi_farmyard.svg
poi_mountain_pass.svg
poi_tower_other.svg
shopping_alcohol.svg
shopping_estateagent.svg
shopping_estateagent2.svg
shopping_estateagent3.svg
shopping_fish.svg
shopping_hairdresser.svg
shopping_laundrette.svg
shopping_mobile_phone.svg
shopping_other.svg
sport_swimming_indoor.svg
sport_swimming_outdoor.svg
tourist_board.svg
tourist_guidepost.svg
tourist_map.svg
tourist_view_point.svg
tourist_wayside_cross.svg
tourist_wayside_shrine.svg
transport_city_limit.svg
transport_zebra_crossing.svg
All the original (as of 2010-09-12, hence newer SJJB icons are missing), modified and new gray scale icons (made by, based on or inspired by SJJB management), along with the scripts I modified and the resulting icons are available here:
http://www.mediafire.com/?hlcck86em3bxqje
Thanks for SJJB who provided most of the icons and the original script!
See http://www.sjjb.co.uk/mapicons/introduction
All the icons that either SJJB or myself created are copyright free (CC-0). I do not know the status of the others (mostly, the others are preinstalled with qgis).
This is a set of GNU/Linux scripts that I adapted from SJJB scripts to generate the coloured svg icons (based on SJJB-compatible icons). You need 3 files. Put them in a folder in which there is a ./svg/ subfolder with the SJJB icons and similar icons. Then execute the first script only:
 #!/bin/bash
 # Main file (to be run on a shell
 # Name of this file: generate_coloured_svg.sh
  BASEFOLDER=`pwd`;

  TYPES=(       'accommodation' 'amenity' 'barrier' 'education' 'food'    'health'  'landuse'  'landuse'  'landuse' 'money'   'place_of' 'poi'     'shopping' 'sport'   'tourist' 'transport' )
  FORGROUND_COLOURS=( '#0092DA' '#734A08' '#666666' '#39AC39' '#734A08' '#DA0092' '#999999' '#734A08'    '#39AC39'  '#000000' '#000000' '#000000'  '#AC39AC'  '#39AC39' '#734A08' '#0092DA' )
  COLOURNAMES=(       'blue'    'brown'   'darkgrey' 'green'  'brown'   'pink1'  'lightgrey'  'brown'   'green'      'black'  'black'   'black'   'pink2'    'green'    'brown'   'blue' )
  SIZES=(32 24 20 16 12)

  SVGFOLDER=${BASEFOLDER}/svg/
  OUTPUTFOLDER=${BASEFOLDER}/svg_col/
  mkdir -p $OUTPUTFOLDER
  for (( i = 0 ; i < ${#TYPES[@]} ; i++ )) do
    mkdir -p ${OUTPUTFOLDER}${TYPES[i]}
    for FILE in `ls $SVGFOLDER${TYPES[i]}_*.svg`; do
      BASENAME=${FILE##/*/}
      BASENAME=${OUTPUTFOLDER}${TYPES[i]}/${BASENAME%.*}
      ${BASEFOLDER}/tools/recolourtosvg.sh ${FILE} 'none' 'none' ${FORGROUND_COLOURS[i]} ${BASENAME}_${COLOURNAMES[i]}.svg
      ${BASEFOLDER}/tools/recolourtosvg.sh ${FILE} ${FORGROUND_COLOURS[i]} ${FORGROUND_COLOURS[i]} '#ffffff' ${BASENAME}_${COLOURNAMES[i]}_bg.svg
    done
  done
 #!/bin/bash
 # Name of this file: recolourtosvg.sh
  # $1 input filename
  # $2 background fill
  # $3 background stroke
  # $4 forground
  # $5 output filename
  ./recolour_mk.sh $1 $2 $3 $4 > ${5}
 #!/bin/bash
 # Name of this file: recolour_mk.sh
 # $1 filename
  # $2 background fill
  # $3 background stroke
  # $4 forground
  # EDIT by MK (differences with SJJB script): there was sometimes a (hexadecimal colour) pattern without semicolumn was replaced by a pattern with semicolumn => 2 semi-columns (handled gracefully by inkscape but not by qgis)
  # Or, on the contrary, some colors in svg files are not followed by ; and were not matched (e.g. the glas for drinkingtap stayed white)
  sed "s/fill:#111111/fill:${2}/g" < $1 | sed "s/fill:#111/fill:${2}/g" | sed "s/stroke:#eeeeee/stroke:${3}/g" | sed "s/stroke:#eee/stroke:${3}/g" | sed "s/fill:white/fill:${4}/g" | sed "s/stroke:white/stroke:${4}/g" | sed "s/fill:#ffffff/fill:${4}/g" | sed "s/stroke:#ffffff/stroke:${4}/g"
If you want to add new icons, take a simple icon that is close enough to the one you want to do, open it with inkscape and study it well; try to do the same: do not create new colous in the grayscale icon otherwise the above scripts will not work properly. Creating new icons with inkscape is fun, pleasant and rewarding.
Create level curves data
This is optional. You can create level curves from SRTM or ASTER. There are many ways to do this.
For large files, it is probably best to put the data in postgis (I'm doing this after using gdal_contour to create shapefiles for various intervals).
Create QGIS project
Add layers
TODO: put screenshot of layer organization; .qgis file?
Load qml styles
Available at http://trac.osgeo.org/qgis/ticket/3222
These qml styles can work but you need to be very careful about how to set up the project and layers. On OSX (QGIS 1.7.2) it required:- Under Project Properties:General setting layer units to metres, then applying this setting;
- Then select 'on the fly' transformation on the CRS tab and apply.
"On the fly" transformation is not required if you've already reprojected the data to UTM (e.g. using the -e option in osm2postgresql).
This works with both osm2postgresql imported data in a PostGIS database as well as the OSM plugin for QGIS (for the latter you will need to select on-the-fly transformations and a UTM code for the project).
Labelling
See http://www.qgis.org/wiki/Map_Labeling
Author
The following two mentions should remain when sharing or transforming one of these maps: Map data (c) OpenStreetMap contributors, CC-BY-SA (all maps). This map (c) Mayeul KAUFFMANN, CC-BY-SA, made with QGIS and osm2postgresql (for the map I created).